Thank You Teacher!
It's Teacher Appreciation week around these here parts, and I have a few project ideas to share with you that are sure to delight your child's teacher. This year, because I'm not on the PTA Board at our school for the first time in a long time, I have more attention to devote to appreciating those wonderful beings that spread love and devotion to our children year round. So here's a project for each day of this wonderful week... enjoy!
Monday... Word Art

So I found this neat little program called Wordle where you can enter all kinds of words and make a word collage. I used their advanced feature to tell it which words I wanted larger than others (follow the example you'll see on their advanced page). You can then alter the font, layout, and colors as you wish until you get the desired outcome. Note: if you see a design you like, print it before you alter it again because once you change the layout or anything else and click on it, you can't go back to the previous layout.

I think she'll be pleased with the result :)
Tuesday... I'm So Fortunate to Have You as My Teacher
I found this project on Skip To My Lou (posted by According to Kelly), and at Eigheen25 and again at Creative Outlet (just a few of many fabulous blogs I love) and knew I had to do it. I would have really liked to do the lighter spring color theme but I didn't find the boxes in the lighter colors. I did, however, find these gorgeous glitter boxes in red... aren't they just perfect?
You'll need:
- Fortune cookies (in the Ethnic isle at your grocery store). It took 8 to fill up each one of these boxes.
- Chocolate chips (if you opt to cover the cookies in chocolate... double yummm!)
- Chinese Take Out Containers (or you can pick some up at your local craft store)
- Ribbon in desired color (I used navy blue as I didn't have black)
- A cute little tag. You can download free printables from either of the blog links above. I'm also sharing the Spanish version of Kelly's printable in Spanish since we had Spanish and French teachers to gift as well :) Thank you Kelly for sharing your font secrets with me :)
.jpg)


- Coat the cookies. That's SUPER easy to do. You melt the chocolate chips over a double boiler, dip the cookies, and refrigerate them for at least an hour. The trickiest part of this was keeping my 3 kids AWAY from the cookies.
- Print the tags and hot glue them onto the containers.
- Make the bows and attach to container handles.
- Place cookies in container and make one teacher very very happy :)
Wednesday... Blessed Beyond Measure
I picked up these little apple measuring spoons at Marshalls. I wish I had found a few more of them because aside from being GORGEOUS, they inspired me to create the cutest little tag to go with them. I uploaded a free printable of the tag you can use. You'll need a 3" circle punch.

You can purchase these exact ones for $12.99 on eBay. Message me for the link :) I also found a similar set at Ice House Crafts for $11.19 which is slightly less than I paid for mine. They also have the cutest measuring cups. Had I found these sooner, I would have ordered a few for all our teachers. This is one of my favorite gifts for the week so far.
Thursday... A Spot of Tea

I ran across a lovely teabag tag at Vintage Pie with the sentiment "You are Tea-rrific". I decided to pair it up with a teacup and saucer set that I had left over from my daughter's tea party themed birthday (originally purchased at Marshalls). Along with the teabag, I added some chocolate Biscotti (I used Noni brand). I then picked up some tulle in a pretty taupe color to go along with the vintage look of the tag, and tied a matching ribbon to it. This one can easily be gifted to a middle or high school teacher. The instructions for making the tag, along with a free printable, can be found HERE.
Friday... Crayon Wreath
Another Pinterest inspired project... as soon as I saw it, I knew I had to do it for our teacher. It looks easy, but I will compare it to making one of those 30-minute meals with Rachel Ray (which actually takes me 2 1/2 hours). It was difficult to get all the crayons on the wreath in the exact angle but after gluing and un-gluing a half dozen or so time (ugh!), I finally got the hang of it. In the end, I lined up the bottom part of the crayons with the smaller embroidery hoop and kept my eye on them from the bottom before gluing the next one. That helped to keep them at the same angle and in line with each other. One little change in the angle can throw off the whole thing so it's a matter of being VERY careful. My daughter painted the embroidery hoops and laced the small orange ribbon around the crayons, and we had fun doing that part.
Here's what you will need to make one:
2 wooden embroidery hoops (12" and 8")
Paint (for the hoops) in your desired color. We used red acrylic paint.
3 boxes of 24 count Crayola crayons.
Hot glue gun with plenty of glue sticks.
2" or thicker ribbon
1/4" ribbon in desired color (we used orange)
2" or thicker matching ribbon (we used a wired orange ribbon with white polka dots)
Wood cut out in the shape of an apple
Paint for the apple (I used the same red that I used for the hoops, and a brown and green acrylic)
Paint pen in desired color (My handwriting skills being what they are, I enlisted the help of a friend (also a teacher :) ) to writer my daughter's teacher's name on it for me and she had a yellow paint pen on-hand... it worked out beautifully... thank you Cristy!)
- Paint the embroidery hoops and apple cutout and let dry.
- Lay the embroidery hoops out on a work surface and center the smaller hoop inside the larger hoop.
- Lay out your crayons on a towel (so they don't slip off) in the order that you are going to glue them. All three boxes should follow the same color order (i.e. yellow, pink, blue, yellow, pink, blue, yellow, you get the message).
- Glue your crayons one by one so that their bottoms all meet side by side at the bottom on the smaller hoop. It's best to lay out all your crayons on the hoops before you glue them down so that you don't lose the spacing. I didn't do this and I paid for it with having to glue and unglue a few of the crayons. You then lift each crayon as you are ready to glue it, put a SMALL dab of glue on each of the hoops, and glue it down, and follow this through until you've reached the last crayon.
- Lace the thin 1/4" ribbon through the bottom part of the crayons, and then lace another piece of ribbon through the top as you see on my wreath. NOTE: You lace every other crayon but you if you lace the bottom of one crayon, that's the one you skip when you are lacing the top; that way every crayon has ribbon on it at either the bottom or top).
- Decide where the top of your wreath is and lace the thicker ribbon around the top to crayons and make a bow. Lace another piece of ribbon around the large embroidery hoop for hanging.
- Write your teacher's name on the apple cutout.
- Hot glue the wooden apple cut out to the wreath.
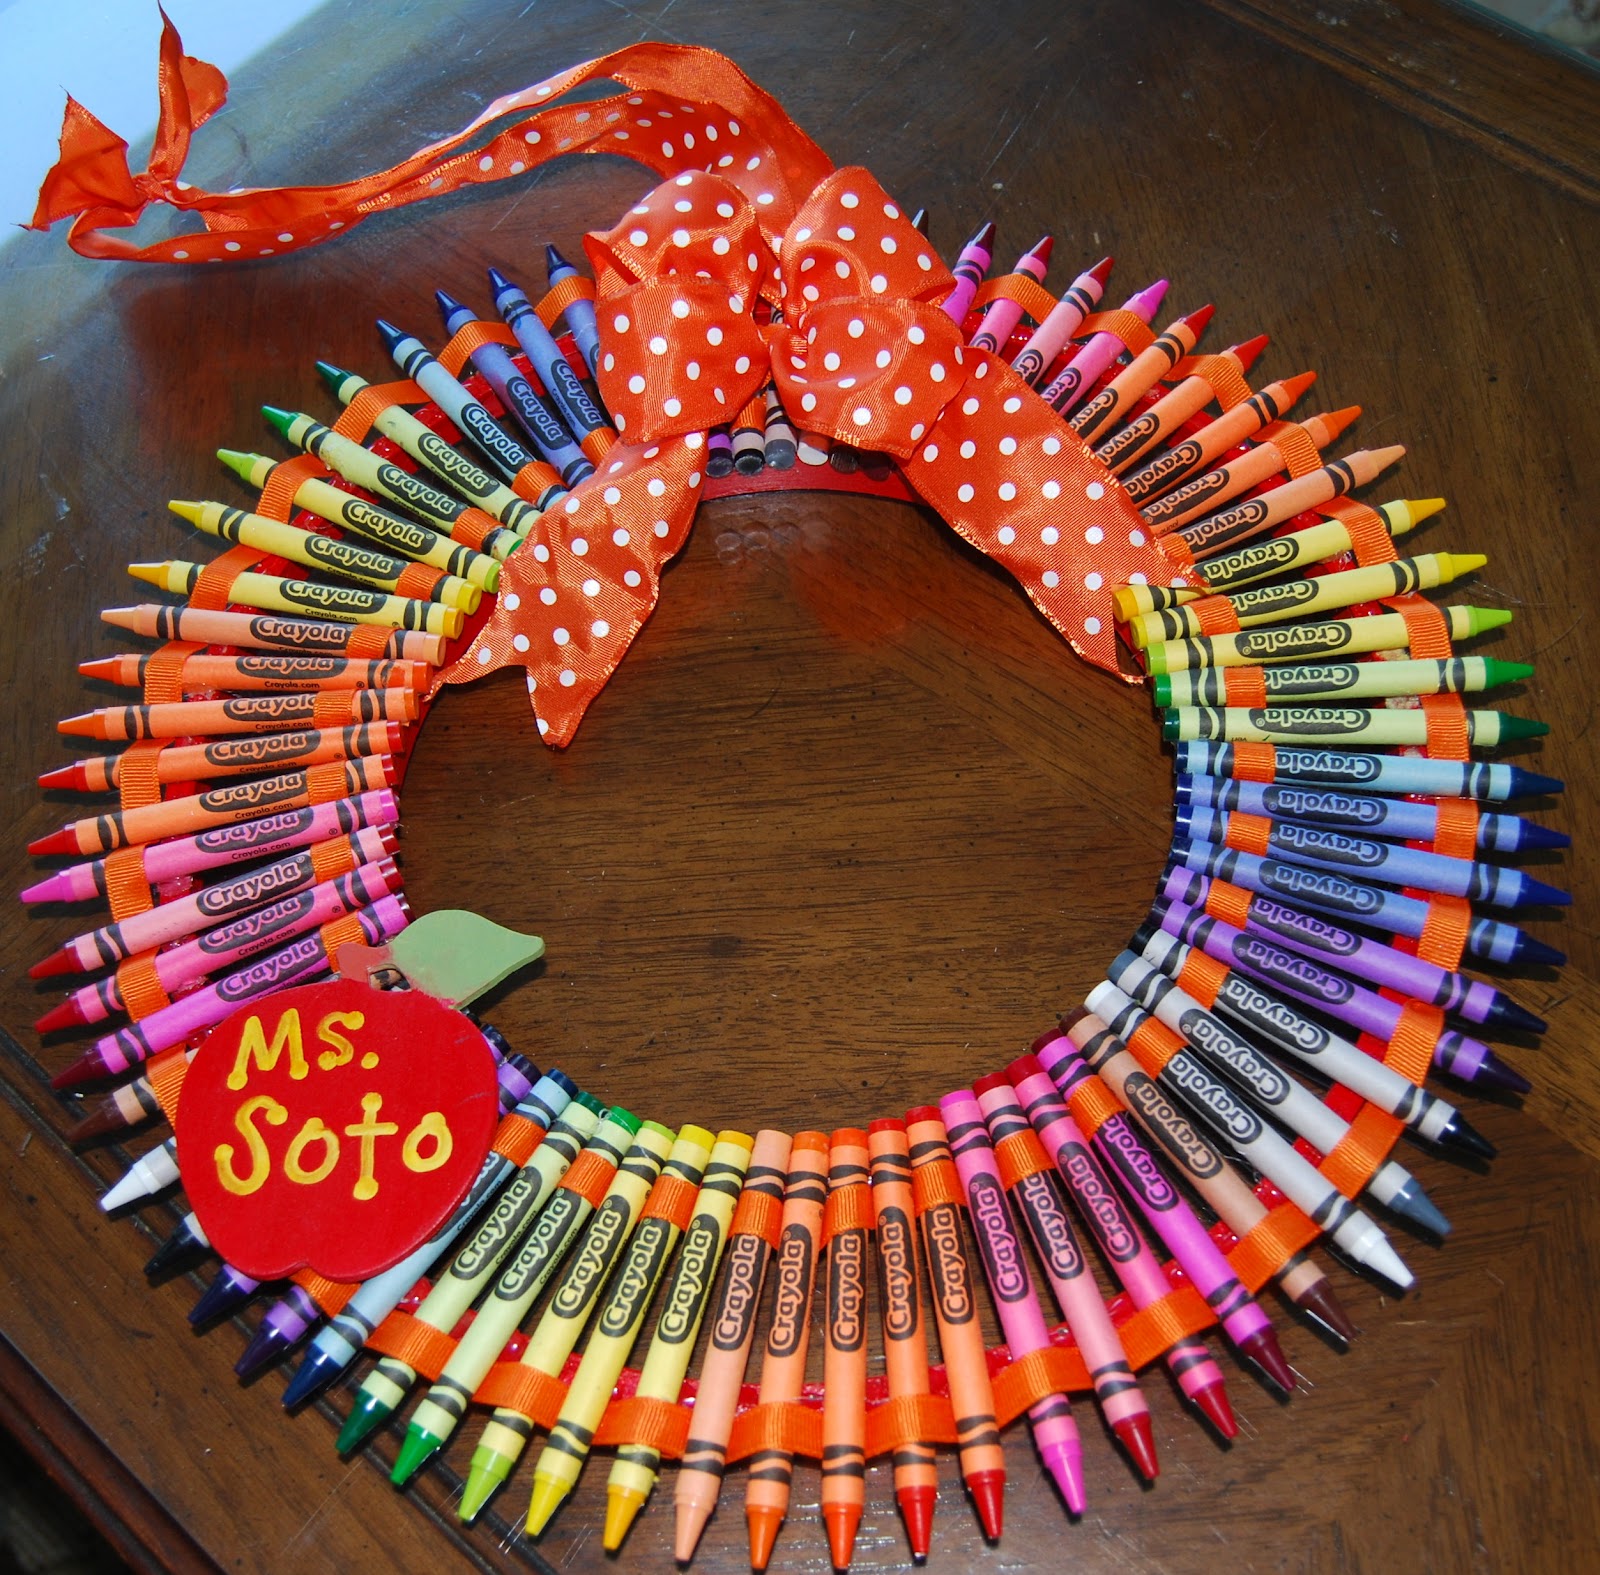
Voila! Your teacher will be thrilled as can be to see this gorgeous wreath hanging in her classroom. Warn her that this is a delicate wreath that should be handled with great care, and probably best NOT to hang it on a door. Our teacher received one of these earlier this year and it fell and shattered to pieces.
For many more teacher appreciation ideas, check out these sources:
Skip To My Lou
Eigheen25
MakingMemoriesWithYourKids
or Pinterest. Some of the ideas can even be used for the end of the school year gifts... 21 days away for us... now that's worth a serious celebration around these here parts... YIPPPEE!!!
Skip To My Lou
Eigheen25
MakingMemoriesWithYourKids
or Pinterest. Some of the ideas can even be used for the end of the school year gifts... 21 days away for us... now that's worth a serious celebration around these here parts... YIPPPEE!!!
No matter what you do, honor your teachers this week in whatever way you can. They do so much with so little (particularly in these budget conscious times), and our children are the beneficiaries of their hard work and dedication all year round. Happy Gifting!
No comments:
Post a Comment